Things Paterno Likes:
The McDSP AE600
The McDSP AE600
www.mix-therapy.com
After the rousing success of our first installment, Mouse has encouraged me to keep going with this series. I know the common wisdom would be to do another type of processor, but I’ve got another EQ to discuss today: The McDSP AE600 EQ.
Why another EQ plugin? Because this one is it for me. My desert island plugin. The one that ends up on everything I do [and has for years!!], in every phase of the process. It is the hammer, the straight edge, the angle, the wedge, the glue, the sandpaper, the paintbrush, the 0000 steel wool, the fine polish cloth – you get the idea. It does what it does in the most straightforward, obvious, elegant, and musical way. Everything you need to get to is right there, right in front of you, with a single click in a fixed point in space.
I’ve been using McDSP EQ since my first ProTools system in the mid-late 90’s. The first plugin I ever bought as FilterBank. When the precursor to the AE600 came out - the AE400 - I knew this was a new era of EQ, with the potential for a new level of control. In the hands of Colin McDowell, this has turned out to be the case.

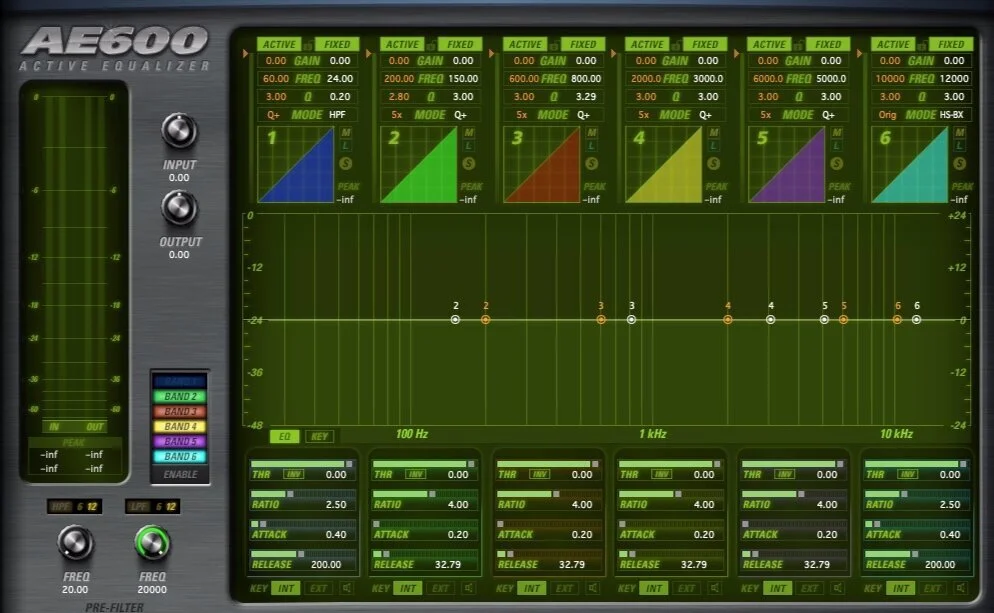
Paterno AE600 start points
This is my start point for the EQ. I only have ten of the twelve possible bands at the ready, and I’ve set my center frequencies for both the Fixed and Active bands where they are the most useful for me. I’ve also adjusted the compression values for the Active bands to values that sound good to me in most situations.
This EQ has the potential to do so many things it would be impossible to cover them all here. It is a manual worth reading [like all manuals], I will say. Six modules, each with an Active and Fixed component, a variable Q type and size for each component, a full set of compression parameters for the active side, an external key input per compression module, and a ‘listen to’ function for each active band per module. Grab a point in the center display, and drag the point to your desired frequency and gain. Also, a simple grab and drag on any number [Gain, Freq, and Q] changes the value in the direction of motion, or a double click will allow for a manual entry of a value.
I’m going to talk about a few things I think are cool about it.
First note where I have the Q modes set. This EQ provides a large number of options – per band:

I love the Q+ for the main fixed bands, which tightens the Q as the gain is increased. It narrows in on the band in a focused and musical way, whether I am increasing the gain or lowering the gain. I really love the shape of the HS-BX for the top band as well. For Band 1, which I usually keep as an ‘as needed’ band, I start it as a HPF. It acts a resonant peaking filter when you increase the gain, which can be great on bass drums.
For the Active side, I have a method that works for me. Basically, it can be termed ‘search and destroy’!!

I like to use the band listening/solo option to ‘zero in’ on problematic resonances. In the example, above, I would have clicked the speaker icon next to the ‘EXT’ button at the bottom of the compression section of band three to solo the band. I would then click on the orange frequency number – or the orange dot in the frequency display area - and move around to find the troublesome spot. Once I find the spot, I decrease the gain a fairly large amount to start, un-solo the band, and adjust the threshold to get gain reduction of the band as needed. From there, I fine-tune the amount of gain, and the threshold. This method also works great if I want fixed reduction. I simply type the number I come up with in the orange frequency box into the white, fixed box, and reduce the gain of that band as much as I need to. Works like a charm!!
This is easily translatable into other things – like doing multiple bands, expanding instead of compressing a band, or key-ing the band from another source, as quick examples.
The other thing I’ve discovered about this EQ is the power of subtle moves. Here’s an example of something I had on the stereo bus of a mix:

It is -0.30dB down at 198.68 Hz in band three, and +0.24dB up at 2123.8 Hz. Although this looks extremely subtle, it made a huge difference in the sound and feel of my mix. I can’t explain why, but it really does when you find the right points. I encourage you to check it out for yourself. This kind of detail and subtlety make it invaluable to me in a stereo bus or mastering application. It helps me preserve the feel and musicality of whatever I am working on. Also note where the orange and white ‘3’ frequencies ended up, and re-read my above method. See, I’m not kidding…
These are a few of the reasons why there will always be an AE600 on every Paterno project. It is simply too useful and musical to not be the first tool I reach for. So good!!
Until we meet again – Practice Listening. Always.
Cheers,
Paterno